Daifuku Mochi
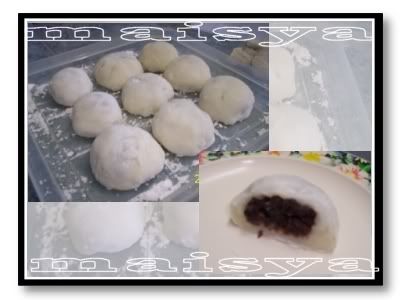 One of my favourite japanese food...Daifuku Mochi. First time try buat sendiri ni...oklah walaupun rupanya kurang cun....susah nak handle the dough sebab dia melekat-lekat. Maisya suka makan lepas dah disejukkan dlm peti ais.
Daifuku ni ala-ala kuih tepung gomak Malaysia la kot....bahan dia cuma tepung pulut, gula, air dan kacang merah sebagai inti. Kemudian disalut dgn tepung ubi kentang/potato starch.
How to Make Mochi Daifuku
The Treasure of Mochi Daifuku
http://www.yuwie.com/blog/entry.asp?id=450345&eid=288809
What You'll Need:
1 1/2 c mochiko(glutinous rice flour)
1/2 c sugar
1 1/2 c water
katakuriko(potato starch) for dusting
koshi-an(red bean paste) for filling
food coloring/flavoring ( optional)
cutting board
cookie cutter
large pot
What These Are:
Mochiko - This is glutinous rice flour.
Sugar - Any kind of sugar will do. Less refined sugar may produce different results, but it shouldn't be too drastic. Just make sure you're prepared no matter what kind you use!
Katakuriko - This is potato starch and is very common in most any Asian food stores. You can also use flour if you like, but in my experience katakuriko works better.
Koshi-an - This is sweet red bean paste, a common filling for many Japanese confections. It has a very different taste than it looks, and many people have mistaken it for chocolate, to some surprise once they take a bite! It is a very popular flavor however, and even red bean ice cream exists as a beloved treat.
Food Coloring - This is entirely optional but adds a festive touch to the daifuku.
Water - If you don't know what this is, you may be in trouble.
Cutting Board - You will need a sizable cutting board, ideally. Just about any kind of cutting board is likely to work, but you do want to give yourself room to work with the mochi.
Cookie Cutter - This will make your job so much easier. Just get a circular cookie cutter and use it to cut out shapes in the mochi.
Large Pot - A large pot, in the likes of which you might cook spaghetti or something similar. It doesn't have to be huge, but a large size is preferable.
Cooking Tips - Before You Begin:
I advise using a wooden spoon to stir your mochi, and of course the cookie cutter and so forth will be metal. Remember to dust your utensils as well as your hands with katakuriko, so that mochi doesn't stick to anything.
It is best to prepare all your ingredients and set them out beforehand. Read the recipe through once before you even begin, so that you can have everything ready.
It works best to have the koshi-an frozen beforehand and just lay it out a few minutes before you start. By the time you reach the point where you'll be using it, it will be thawed only enough so as to be easy to form into balls and insert easily into your daifuku.
When cooking, an apron will help you avoid dirtying your clothes. Mochi is very sticky, so you will want to do anything you can to avoid getting it on your clothes!
Always wash your hands before preparing or handling food. Always make sure to use clean utensils and clean surfaces, and always clean up carefully afterwards.
Have the sink cleared and ready, because you will need to soak the pot immediately after you have poured out the mochi so that the mochi residue does not set up.
Do not pour mochi down a sink's drain. Take a sturdy paper towel or other cloth and get the mochi left in the pot after you've soaked it, and throw it out. If mochi is left to solidify it can be extremely difficult to get out of anywhere!
Do not under any circumstances handle the mochi before it has cooled down, because it is sticky and can cause terrible burns before you can get it off!
Cooking Your Mochi:
1. First, take your mochiko, water, and sugar, and mix them together in the large pot. You'll want a uniform consistency so mix them until everything has blended as much as it can. If you wish to use food coloring, use it now and blend it in so that you will have a consistent color. Only use one or two drops; a little goes a long way!
2. Before you advance to the next step, get out your cutting board and put it in a convenient place. Once it's there, dust the entire surface with katakuriko, and put extra out on the board to have when you pour the mochi there. If you haven't already set out your koshi-an, you should do it now.
3. Turn on the stove and let the mochi get hot. Mid to mid-high level heat is usually fine for this, but you don't want it to actually reach a boil. Keep stirring constantly so that it doesn't burn or stick unnecessarily.
4. Once it has thickened and has the consistency of thick liquid (it should be mildly difficult to stir by this point) take it off heat and pour it into the cutting board. Let it sit there for a few minutes to cool; it will spread somewhat, but it shouldn't leave the cutting board.
5. After pouring the mochi out onto the board, immediately take your pot to the sink and fill it with warm soapy water, and leave it in the sink to soak. Do not under any circumstances let the mochi dry in the pot! Check your koshi-an; by now it should still be somewhat solid but pliable enough to work with. If it's still in its package, remove it or open the package enough to access it.
6. Once the mochi has cooled sufficiently to work with (it can be warm, just make sure it's not hot), dust your hands with liberal doses of katakuriko and then dust your utensils like the cookie cutter. Cut out circles and fold them up around balls of koshi-an. These should be easy to make since the koshi-an will still be partially frozen. Just fold the mochi up and around it, perhaps mold it with your hands, and you'll have a nice daifuku! Some of the katakuriko from your hands will come off with each daifuku, so please remember to dust your hands every time they seem to be getting bare. You should also sprinkle katakuriko on the daifuku when you finish each one. Set each finished daifuku aside on a plate, and make sure they aren't touching each other. You may need more than one plate, until they dry and set up properly.
7. Continue until all the dough is gone. This should make enough daifuku for a small group to enjoy! Once they've cooled and set up, the koshi-an inside will be of a perfect consistency. It's an easy method, but it gives you great results!
Serving Ideas:
Mochi daifuku are wonderful as a dessert or a snack, or just enjoyed by themselves anytime. You can serve them alone, or you can even accompany them with ice cream, festive drinks, or even use them as side dishes to larger meals.
You can alter the recipe slightly to make sakura mochi, by omitting the koshi-an, adding a slight cherry flavor, and wrapping the mochi in pickled sakura leaves. These are somewhat difficult to find out-of-season however, so unless you have a sakura tree and can pickle them yourself, you may wish to omit the leaves!
You can also add other flavors as you cook. Personally I like to add a small amount of real vanilla extract in step 1 and blend it thoroughly into the mochi. It adds just enough flavor to give it a smooth, enjoyable bouquet.
Be imaginative! You can do all kinds of things with mochi. You don't have to use koshi-an to stuff them...you can use fresh fruit, vegetables, just about anything. Be creative with these sweet, refreshing cakes!
Ulasan